How to import CSV/TSV files?
The application allows you to import landmarks (waypoints, routes, tracks, areas) from any .csv, .tsv and more generally delimiter-separated values files and display them on the map:
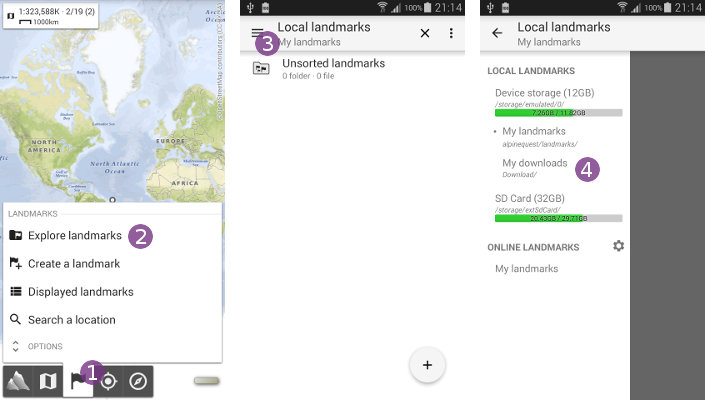
- Tap on the
“Landmarks” menu icon and on
 “Explore landmark” . The default landmark folder is listed;
 - Select the folder in which the file to import is located. If needed, tap on the top left menu
 to list the main folders of your device. For example, tap on
 “My downloads” to select the folder
 “/storage/emulated/0/Download/”.
Once the file to import is displayed ![]() , tap on it to display the import settings
, tap on it to display the import settings ![]() :
:
- If needed, tap on
“Folder”to import the file in the current folder instead of the default import folder; - If needed, tap on
“Charset”to select the file charset if it's different from the device charset; - If needed, tap on
“Landmark”to select the type of landmark to create from the imported locations; - If needed, tap on
“Separator”to select the column separator character; - If needed, tap on
“Location format”to select the coordinates format of the file; - If needed, un-check
“Headers in first row” if the first line of the file is not used to store headers (column labels);
 - For each column, tap on the assignment button
 to select a corresponding type (you must select at least a
 “Coordinates”column or a“Latitude / Y”and a“Longitude / X”column);
![]() Some of the columns may already be assigned since the application tries to detect them from the headers.
Some of the columns may already be assigned since the application tries to detect them from the headers.
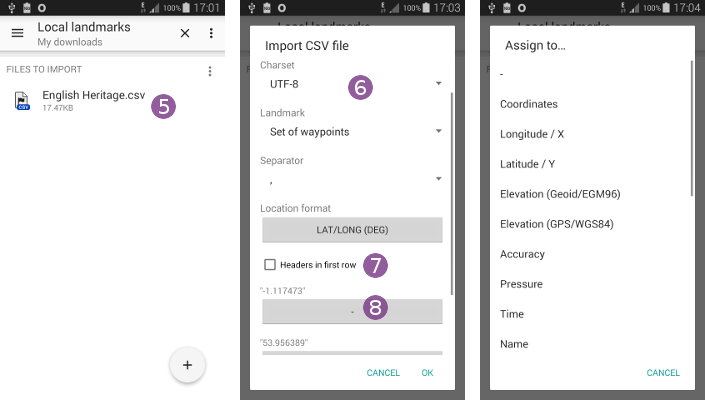
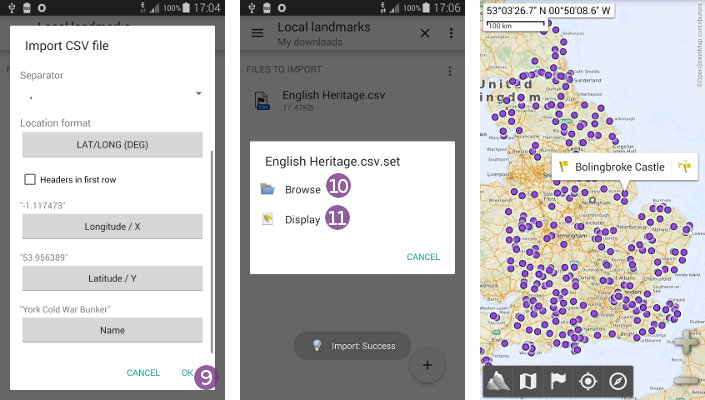
When you've assigned an import type to all the columns you want, tap on “Ok” ![]() to start the import. In this example, the application will read the location longitudes from the first column, the latitudes from the second one, and the names from the third column.
to start the import. In this example, the application will read the location longitudes from the first column, the latitudes from the second one, and the names from the third column.
Wait some time for the file to be imported. When it's done, you can:
- Choose
“Browse” to list the content of the imported file, for example if you want to display only few items;
 - Choose
“Display” to display the entire file content on the map.
How to export CSV/TSV files?
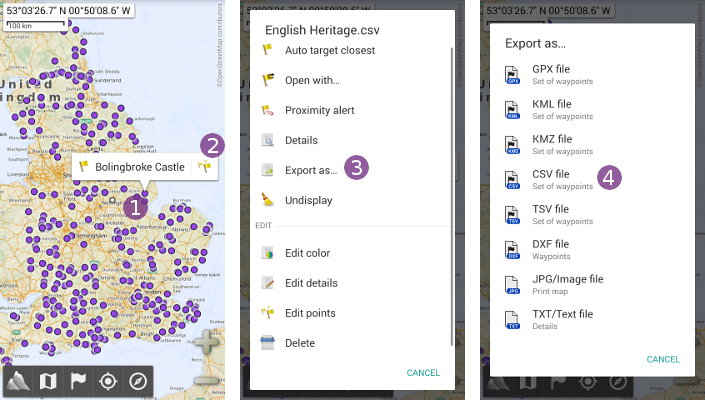
To export a landmark in a .csv or .tsv file and use it in an external application:
- Tap on a displayed landmark on the map
 and on its icon
  (you can either tap the waypoint icon to only export the selected waypoint or tap the set icon to export all the waypoints of the set);
 - Choose
“Export as…” ;
;
In the list of available export formats, choose “CSV file” ![]() for comma-separated values, or
for comma-separated values, or “TSV file” for tabulation-separated values.
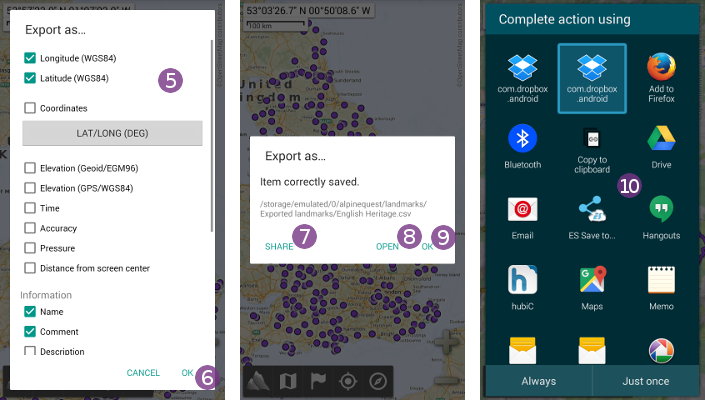
In the export settings, select all the columns you want to export ![]() , and tap on
, and tap on “Ok” ![]() to export the landmark.
to export the landmark.
Among available fields (depending on what is recorded in the exported landmark), you'll find:
“Longitude”and“Latitude”, the coordinates of the points in the WGS84 (GPS) datum;“Coordinates”, the coordinates of the points in another datum you can select;“Elevation”, the elevations of the points, either in the WGS84 (GPS) datum or in the EGM96 (Geoid) reference;“Time”, the dates and times recorded of the points in millisecond (unix time format);“Accuracy”, the accuracies of the points in meters, with a 68% confidence;“Pressure”, the pressures recorded of the points, in hectopascal (hPa);“Distance from the center”, the distances from the current map center of the points, in meter (m).
Once the landmark has been exported, the full path of the exported file ![]() is displayed.
is displayed.
- Tap on
“Share” to share the file (send it as email, upload it on Dropbox, etc.), available actions
  depend on the applications installed on your device;
 - Tap on
“Open” to open the file with a compatible application installed on your device;
 - Tap on
“Ok” to close the dialog.
![]() Be careful when trying to access the exported file from a computer using an USB cable, Android takes time to update the file list of your device, and newly created ones may not be immediately visible.
Be careful when trying to access the exported file from a computer using an USB cable, Android takes time to update the file list of your device, and newly created ones may not be immediately visible.
