Table of Contents
Online Help > Maps & Layers > Digital Elevation Model (DEM)
Digital Elevation Model (DEM)
This feature allows the application to download and store elevation values of remote locations and let you use them in various ways, even while being offline.
Those elevations come from various sources including the SRTMGL1(v3) database and are currently available between latitude 56°S and 60°N with a precision of 1″ (1 arc-second).
![]() This feature requires an in-app purchase.
This feature requires an in-app purchase.
How to activate the use of elevation values?
To activate the use of elevation values:
- Tap on the
“Maps”menu and on
 “Available maps” ;
; - Tap on the top left menu
 and on
 “Elevation data” ;
; - Check
“Activate use of elevation data” .
.
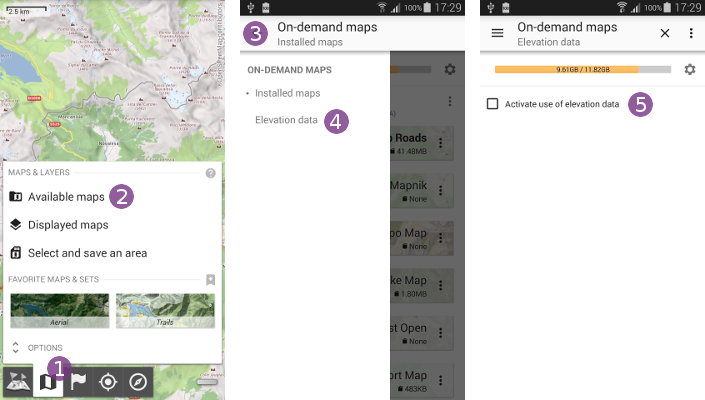
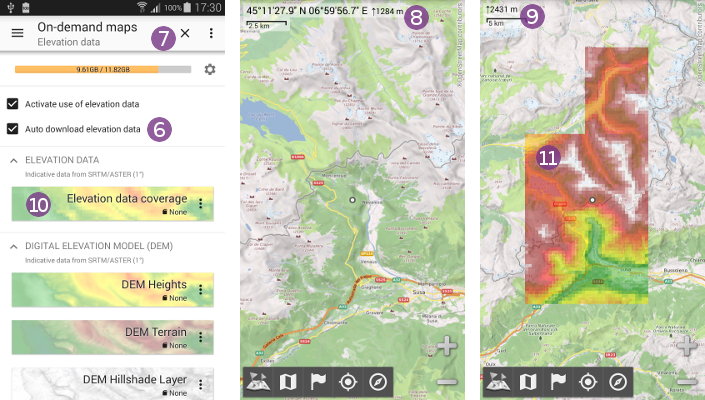
Be sure to also check “Auto download elevation data” ![]() so the application automatically downloads needed areas from our servers. If you want to use your own elevation data (see below), then un-check this option.
so the application automatically downloads needed areas from our servers. If you want to use your own elevation data (see below), then un-check this option.
Close the maps explorer by tapping on ![]() . As you move the map, the elevation of the screen center point
. As you move the map, the elevation of the screen center point ![]() is given along with its coordinates. If the screen center coordinates are not displayed, the elevation on the center point will be displayed alone
is given along with its coordinates. If the screen center coordinates are not displayed, the elevation on the center point will be displayed alone ![]() .
.
If you want to check the coverage of stored elevation values, you can display the “Elevation data coverage” ![]() layer by tapping it. Stored areas will be displayed
layer by tapping it. Stored areas will be displayed ![]() over the current map.
over the current map.
If you have troubles downloading elevation values, check that:
- Your Internet connection is active;
- The option
“Auto download elevation data”is checked (you can also access it directly from the“Maps”menu, in the“Options”section); - The option
“Use only local storage”is not checked (see here).
How to use maps and layers based on elevation data?
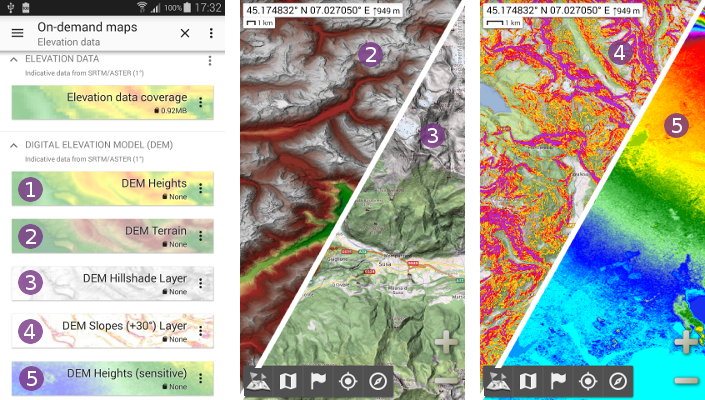
When the use of elevation data is activated, a new set of maps and layers is added to the installed maps list. Those maps and layers are generated by the application based on the stored elevation data, they do not require any additional download.
The set contains:
“DEM Heights” : a map associating each elevation value with a different color;
“DEM Terrain” : a map with more close to reality elevation colors, hills-shading and grayed cliffs (>45°);
“DEM Hillshade Layer” : a layer that can be added over any map, emphasizing relief by simulating hill shades;
“DEM Slopes (+30°) Layer” : a layer that can be added over any map, emphasizing steep slopes: transparent to yellow (25° → 30°), yellow to orange (30° → 35°), orange to red (35° → 40°) and red to purple (40° → 45°);
“DEM Heights (sensitive)” : a map showing the smallest elevation variations;
How to get elevation profiles of paths?
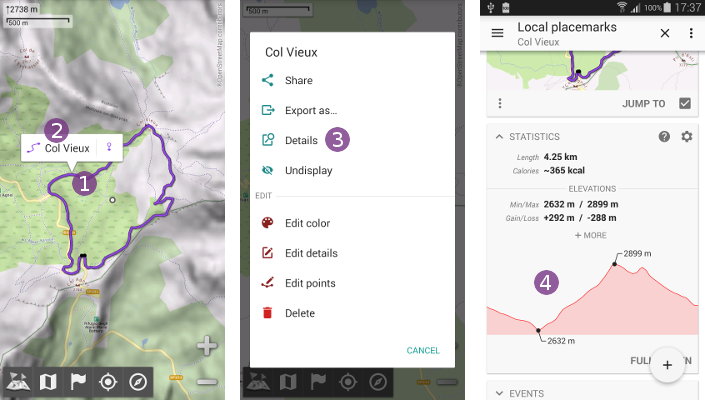
When manually drawing a path or automatically drawing a path along roads over an area with elevation values stored, you can get the elevation profile and gain of that path:
- Tap anywhere on the path
 and select its name
  ;
; - Select
“Details” and check the
 “Statistics” part.
part.
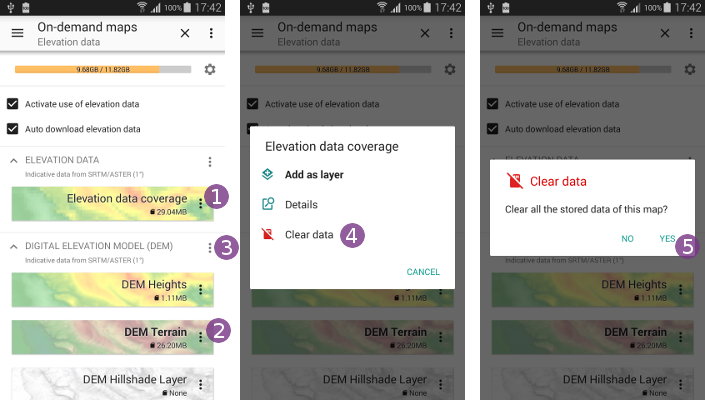
How to delete stored elevation data?
In order to delete the elevation data stored on your device:
- Tap on the “
Elevation data coverage” menu icon ;
; - Select “
Clear data” ;
; - Tap “
Ok” to confirm;
In addition, you can delete the data used by maps and layers generated from the stored elevation data. To do so, use the menu ![]() of the map you want to delete the data, or the group menu
of the map you want to delete the data, or the group menu ![]() if you want to delete the data of all maps.
if you want to delete the data of all maps.
How to use your own DEM data files?
If you don't want to use DEM values automatically downloaded by the application, you can use your own files. As long as the application finds the elevation data it needs, nothing will be downloaded.
You must use DEM files in the “.HGT” format (either 1201 or 3601 values per lines), following the usual rules:
- File names must follow the .HGT naming convention;
- Files containing 1201×1201 values (3″) must have a size of
“2,884,802 bytes”; - Files containing 3601×3601 values (1″) must have a size of
“25,934,402 bytes”;
The files must be copied inside the sub-folder “/datastore/dem/” of the application folder (the same folder used by the application to store the downloaded elevation data).
![]() If your own data doesn't cover a requested area, the application will automatically download the missing data in its own format which may interfere with your own data. Be sure to turn off the automatic download of elevation data (see first paragraph).
If your own data doesn't cover a requested area, the application will automatically download the missing data in its own format which may interfere with your own data. Be sure to turn off the automatic download of elevation data (see first paragraph).
Problems with elevation data
What if I get error messages when using elevation data?
It's likely because the elevation data storage is corrupted. Most of the time, this is due to “cleaning/optimizing” applications that delete parts of the storage (usually the biggest files) and claim to have freed space. If you use such application, be sure to correctly setup it. To fix the errors, you need to clean up the stored elevation data.