Table of Contents
Where does the application store its data?
The application folder is the unique folder used by the application to store all its data on the user device, including:
- Stored maps for off-line use;
- User landmarks, when using the default landmarks folder;
- Imported and exported landmarks, details or map images;
- Pictures used in waypoints;
- Various technical data.
This folder is automatically chosen during the first application start, and is usually located on the external SD card (if available) for devices running Android lower than 4.4, or on the device memory for Android 4.4 and after (SD card storage behavior has considerably changed since then).
Inside the application folder, you'll find the following sub-folders:
/datastore/, where the application stores downloaded data like on-demand maps;/icons/, where you can store your custom icons;/landmarks/, where the application stores (by default) the landmarks you create (waypoints, routes, tracks, areas);/logs/, where the application store its technical logs;/pictures/, where the application stores pictures associated with picture waypoints (on some devices these pictures are saved in the device common media folder);
How to locate the application folder?
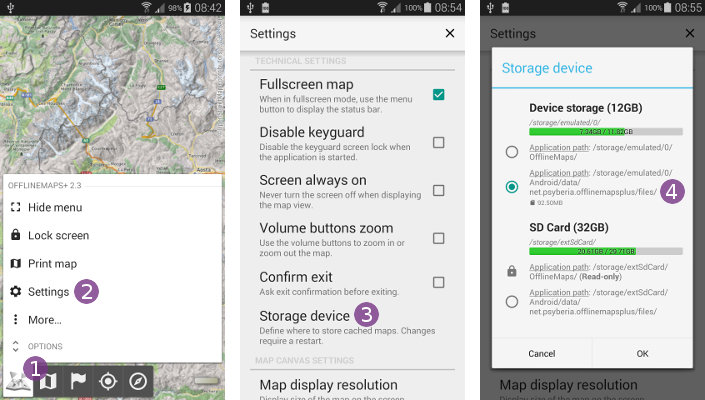
To display the application folder:
- Click on the main menu icon
 ;
; - Click on “
Settings” ;
; - Scroll the list and select “
Storage device” ;
; - Locate the
“Application path” of the selected storage device.

How to change the application folder?
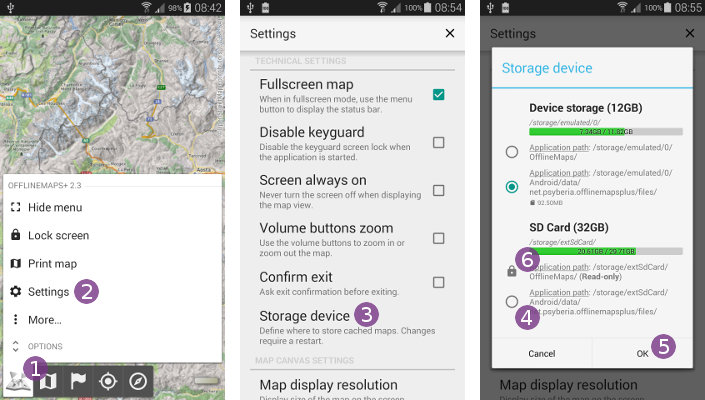
To modify the storage location:
- Click on the main menu icon
 ;
; - Click on “
Settings” ;
; - Scroll the list and select “
Storage device” ;
; - Choose one of the available locations
 ;
; - Click on “
Ok” to validate the change;
 - Restart the application.
![]() Be careful if you choose a storage location within the
Be careful if you choose a storage location within the “/Android/data/” folder as Android will delete it when you un-install the application.
![]() If you see a small locker
If you see a small locker ![]() icon, it means that the application isn't able to write in this location, and so it cannot be used. Check the troubleshooting section below for more details.
icon, it means that the application isn't able to write in this location, and so it cannot be used. Check the troubleshooting section below for more details.

Application folder on the external SD card troubleshooting
Android 4.4
In Android 4.4 and above, the memory management has been modified:
- The device internal memory is called “Primary external memory”. This is the main storage memory, used by default by the application. This memory is usually quite large (up to hundred of GB);
- The SD card external memory (available on some devices only) is called “Secondary external memory”. This space is not freely editable by applications anymore, only a specific folder per application can be used, that's why you may only have one location available on the external SD card.
Android 6.0
In Android 6.0 and above, you can now grant the application the right to write on the external SD card from the Android settings (“Applications” section).
If no storage location choices at all are available on the external SD card:
- Be sure that your device is not currently plugged to a computer using an USB cable;
- Be sure that the SD card is not currently being checked for errors (usually happens after starting the device or removing the USB cable);
- If you have Android 6.0 or above, you must grant the application to write on the external memory from the Android settings (“Applications” section), see more details here;
- Try to restart the device;
- Try to un-install and re-install the application (be careful if you have stored data you want to keep);
- In the Android settings (“Storage” section), try to un-mount your SD card and check it for errors.
Re-using data stored before Android upgrade
If you stored data with the application on the external SD card before upgrading to Android 4.4, this data is now read-only and cannot be used any-more.
Here is the solution to retrieve it:
- Configure the storage to use the new location on the external SD card as explained above;
- Quit the application, and connect your device to your computer using your USB cable;
- Using your computer's file manager, move all content of the legacy folder (usually
“/sdcard/OfflineMaps/”) into the new storage folder (usually“/Android/data/net.psyberia.offlinemaps/files/”). Overwrite all items already present if necessary; - Disconnect your device, wait for the SD card to be checked (if needed), and restart the application. You should then be able to use your previously stored maps, and store new ones.
How to access data stored outside of the application folder in Android 11 and above?
Starting with Android 11, drastic changes have been made by Google regarding how applications can access data stored outside of the application specific folders: except for file managers (and a few other specific cases), applications are only able to access media files from the shared storage spaces (internal device and removable SD card). It means that all your file-based maps and placemarks saved outside of the application specific folders are no more accessible.
![]() Those limitations don't apply if you update the application from version 3.8 (or below) to version 3.9 (or above).
Those limitations don't apply if you update the application from version 3.8 (or below) to version 3.9 (or above).
However, applications still keep a total access on their application specific folders (read and write everything). There is one application specific folder on the internal device memory, and one application specific folder on the removable SD card (if any).
For OfflineMaps, the path of this folder is “/Android/data/net.psyberia.offlinemaps/files/”.
For OfflineMaps+, the path of this folder is “/Android/data/net.psyberia.offlinemapsplus/files/”.
Here are some workarounds:
Placemarks
- Move your placemarks inside an application specific folder, inside the “
landmarks/” sub-folder. For OfflineMaps, that would be “/Android/data/net.psyberia.offlinemaps/files/landmarks/”; - Move your placemarks inside an application specific media folder. For OfflineMaps, that would be “
/Android/media/net.psyberia.offlinemaps/”; - Open your placemarks from your file manager, the application will be listed in the possible choices for handling this file.
Maps
- Move your maps inside an application specific folder, inside the “
maps/” sub-folder. For OfflineMaps, that would be “/Android/data/net.psyberia.offlinemaps/files/maps/”; - Move your maps inside an application specific media folder. For OfflineMaps, that would be “
/Android/media/net.psyberia.offlinemaps/”; - Add the file extension
“.mp3”to your maps, this way the Android system will consider the map file as a media file and will allow the application to access it. For example, rename your QCT map “my_map.qct” to “my_map.qct.mp3” (do not remove the original “.qct” file extension).
How to move your files?
In order to move your files from or into into an application specific folder, the recommended way is to use an Android 11 compatible file manager (“Cx File Explorer” or “X-plore File Manager” for example).
Alternatively, you can plug your device on your desktop computer (using your USB cable) and use it to move the files (may not work for some setups);