This is an old revision of the document!
Table of Contents
How to create custom maps?
The application uses an XML based format for its maps configuration. Files must have an .AQX extention and be placed in the “[application folder]/cache/custom-maps/” folder.
Basic example
Here is a simple example to access the default http://www.openstreetmap.org/ map:
- TEST1.AQX
<?xml version="1.0" encoding="utf-8" ?>
<aqx version="7">

  <name>Simple Test AQX</name>
  <description>© OpenStreetMap</description>

  <source id="MAP01">
    <name>Standard Mapnik</name>
    <zoom-values>3,5,7,8,9,10,11,12,13,14,15,16,17,18,19</zoom-values>
    <server><![CDATA[http://a.tile.openstreetmap.org/{$z}/{$x}/{$y}.png]]></server>
  </source>

</aqx>
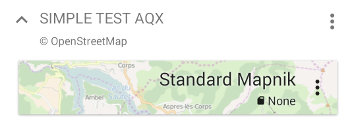
This example will be displayed like this in the application:

Note that the application will recognize the {$x}, {$y} and {$z} variable and replace them with correct values.
The source id field must be unique in the file, and contains only characters and numbers. It is used internally by the application to identify the data storage of the map.
Advanced example
A lot of optional fields have been omitted in the basic example, so here is a more complete example:
- TEST2.AQX
<?xml version="1.0" encoding="utf-8" ?>
<aqx version="7">

  <name>Simple Test AQX</name>
  <description>© OpenStreetMap</description>

  <source id="MAP01">

    <name>Standard Mapnik</name>
    <data-source>http://www.openstreetmap.org</data-source>
    <copyright>OpenStreetMap contributors (CC-BY-SA)</copyright>
    <preview-location>5.90,44.80,12</preview-location>

    <zoom-values>3,5,7,8,9,10,11,12,13,14,15,16,17,18,19</zoom-values>
    <update-delay>3M</update-delay>
    <max-threads>2</max-threads>
    <user-agent>MyApp</user-agent>
    <referer><![CDATA[http://www.openstreetmap.org/]]></referer>

    <server><![CDATA[http://a.tile.openstreetmap.org/{$z}/{$x}/{$y}.png]]></server>
    <server><![CDATA[http://b.tile.openstreetmap.org/{$z}/{$x}/{$y}.png]]></server>
    <server><![CDATA[http://c.tile.openstreetmap.org/{$z}/{$x}/{$y}.png]]></server>

  </source>

</aqx>
The preview location (approximate longitude, latitude and zoom id) allows the application to display the map with a preview background:

Quadtree encoded tiles
Instead of using the {$x}, {$y} and {$z} variables, you can use the {$q} variable that contains the quadtree encoded coordinates of the tiles, like in this example:
  <source id="MAP02">
    <name>Quadtree Map Example</name>
    <zoom-values>3,5,7,8,9,10,11,12,13,14,15,16,17,18,19</zoom-values>
    <server><![CDATA[http://map.example.com/tiles/{$q}]]></server>
  </source>
Custom variables
In addition to the variables provided by default, you can create your own variables defined by mathematical expressions:
  <source id="MAP03">
    <name>Custom Variables Map Example</name>
    <zoom-values>3,5,7,8,9,10,11,12,13,14,15,16,17,18,19</zoom-values>
    <expression set="my_variable" type="int">iif( z>10, x*y, x+y )</expression>
    <server><![CDATA[http://map.example.com/tiles/{$my_variable}.png]]></server>
  </source>
The “set” attribute defines the name of the custom variable, the “type” attribute tells how to display the variable (either int, long, float or double).
